| Introduction to the Device Manager |
|
The device manager is for basic configuration and monitoring of the switch. Use this introduction to familiarize yourself with its features. • Menus The device manager is a graphical device management tool that provides real-time views of the configuration and performance conditions for a single switch. It provides features such as Express Setup and Smartports to simplify switch management tasks. It also uses graphical, color-coded displays such as a front panel view of the switch, graphs, and animated indicators to simplify switch monitoring tasks. To use the device manager, you do need some basic knowledge about networking. For an overview of networking fundamentals, see “Networking Essentials for Small and Medium-Sized Businesses.” For comprehensive configuration and monitoring features, use Network Assistant or the switch command-line interface (CLI). You can display the device manager from anywhere in your network through a web browser such as Microsoft Internet Explorer or Netscape Navigator. See the switch release notes for the system requirements for running the device manager. The Support window provides a link to the switch documentation. Note: We recommend that you run the cryptographic software image on the switch and use the device manager in a secured session. See Using Secured Sessions for information on protecting your device manager session from unauthorized access. The Front Panel view is a graphical display of the
switch front panel. The display shows all the switch components color-coded
according to their status. The colors can help you to quickly see if
a faulty condition or an error condition exists. See the
The Uptime field shows how long the switch has been
operating since it was last powered on or was restarted. Status is automatically
refreshed every 60 seconds or when you click
Move the pointer over a port to display the port number, description, status, speed, duplex mode, and Power over Ethernet (PoE) status. Note that the speed and duplex mode for a port only appear in the pop-up window when a device is connected to the port. The PoE status is available only if the switch is a PoE switch. Move the pointer over these items for additional information:
On switches that contain a wireless LAN controller, the Front Panel view also displays a graphical representation of the internal ports to help you monitor their status by using the device manager. See the switch hardware installation guide about the different ports on the switch. The system, RPS, and port LEDs on the display match the LEDs on the physical switch. To change the type of information displayed through the port LEDs, you can choose a mode from the View list or click the Mode button. The LEDs for the Ethernet Management (Fa0) port and for the AC and DC power supplies also match the LEDs on the switch. To display the information of another switch in the stack, choose a stack member number from the Stack list.
This list summarizes the information provided by
the LEDs on the Front Panel view. For more information about the LEDs,
see the
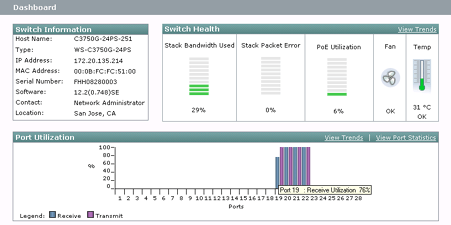
The Dashboard provides information about the switch and is the main window for monitoring the switch status and its performance. For more information about the gauges, indicators, and graphs, see Dashboard.
The switch uses the Secure Sockets Layer (SSL) protocol to secure the HTTP communications between the switch and your network management station. When you attempt to display the device manager, this protocol: • Authenticates the web-based connection between the switch and your network management station • Encrypts and decrypts the information exchanged between the switch and your network management station to protect the information from unauthorized access over the Internet SSL is enabled by default on the switch. It is available only on the cryptographic version of the Cisco IOS Release 12.2 and later switch software image. When the device manager is first launched, it displays a message that asks if you want a secured session with the switch. If you choose Yes, the switch launches the device manager in secure mode. You can also start a secured connection by entering https:// before the switch IP address. (HTTP over SSL is abbreviated as HTTPS.) You can also click the Session: Standard | Secured link at the top right corner of the device manager window. Click Standard to launch an unsecured session. Click Secured to launch a secured session. There are several ways to determine whether your device manager session is secured: • Look at the URL in the browser Address field. A URL that starts with https:// means that the session is secured through SSL. A URL that starts with http:// means that the session is not secured. • Look at the Session: Standard | Secured link at the top right corner of the device manager window. If the link appears as Session: Standard | Secured, then the switch is running a secured session. If the link appears as Session: Standard | Secured, then the switch is not running a secured session. • Look for a locked padlock image at the bottom of your browser window. The locked padlock appears only if the session is secured. Note: SSL is not supported on Telnet connections with the switch. As a result, when you open a Telnet session from the device manager, the transmission to and from the switch is not secure even though the device manager might be running in secured mode. Be careful with the information that you send through your Telnet sessions.
|